CW has interested me for quite a while, but the classic entry barrier is high: copy Morse reliably, send clean code and remember the structure of a QSO at the same time. That is exactly why I am currently testing Nexus. The software can do far more than CW, but my own hands-on testing is focused almost entirely on this mode right now.
The part I find especially interesting is that Nexus lets me make a real CW QSO even though I cannot yet copy Morse confidently by ear or send it manually. Nexus helps with decoding, provides a very complete CW cockpit and can transmit prepared QSO elements through function keys. It does not replace learning CW, but it lowers the barrier to the first real on-air contact dramatically.
Nexus is much more than CW software
Before focusing on CW, one thing is important: calling Nexus a CW program would seriously undersell it. The interface alone shows how broad the project is. There are areas for Phone, CW and digital modes, plus spots, logbook, awards, statistics, POTA/SOTA and several connection and integration features. The settings include separate sections for Station, Radio, Phone, CW, Digital, Spots & Alerts, Logging & Connectors, Contesting and Appearance.
From the feature set, Nexus feels more like a complete amateur-radio operating environment than a single-purpose utility. I have not tested every part in depth and I do not want to pretend that I can already judge every feature. My first impression is still very clear: it is a huge application and, at least from the available controls and options, leaves very little on the wish list. This article deliberately stays with the part I actually use right now: CW with my Yaesu FTX-1.
Download and project page
Nexus is available as a project on GitHub. I deliberately link to the repository rather than to one installer, so the documentation, source code and current releases are always reachable from the official project page.
1. Configure the station in Nexus
I started by entering the basic station information. In my case that is callsign DA6IT, locator JO31EJ and my operator name. These values are used in several places during operation, logging and macros.
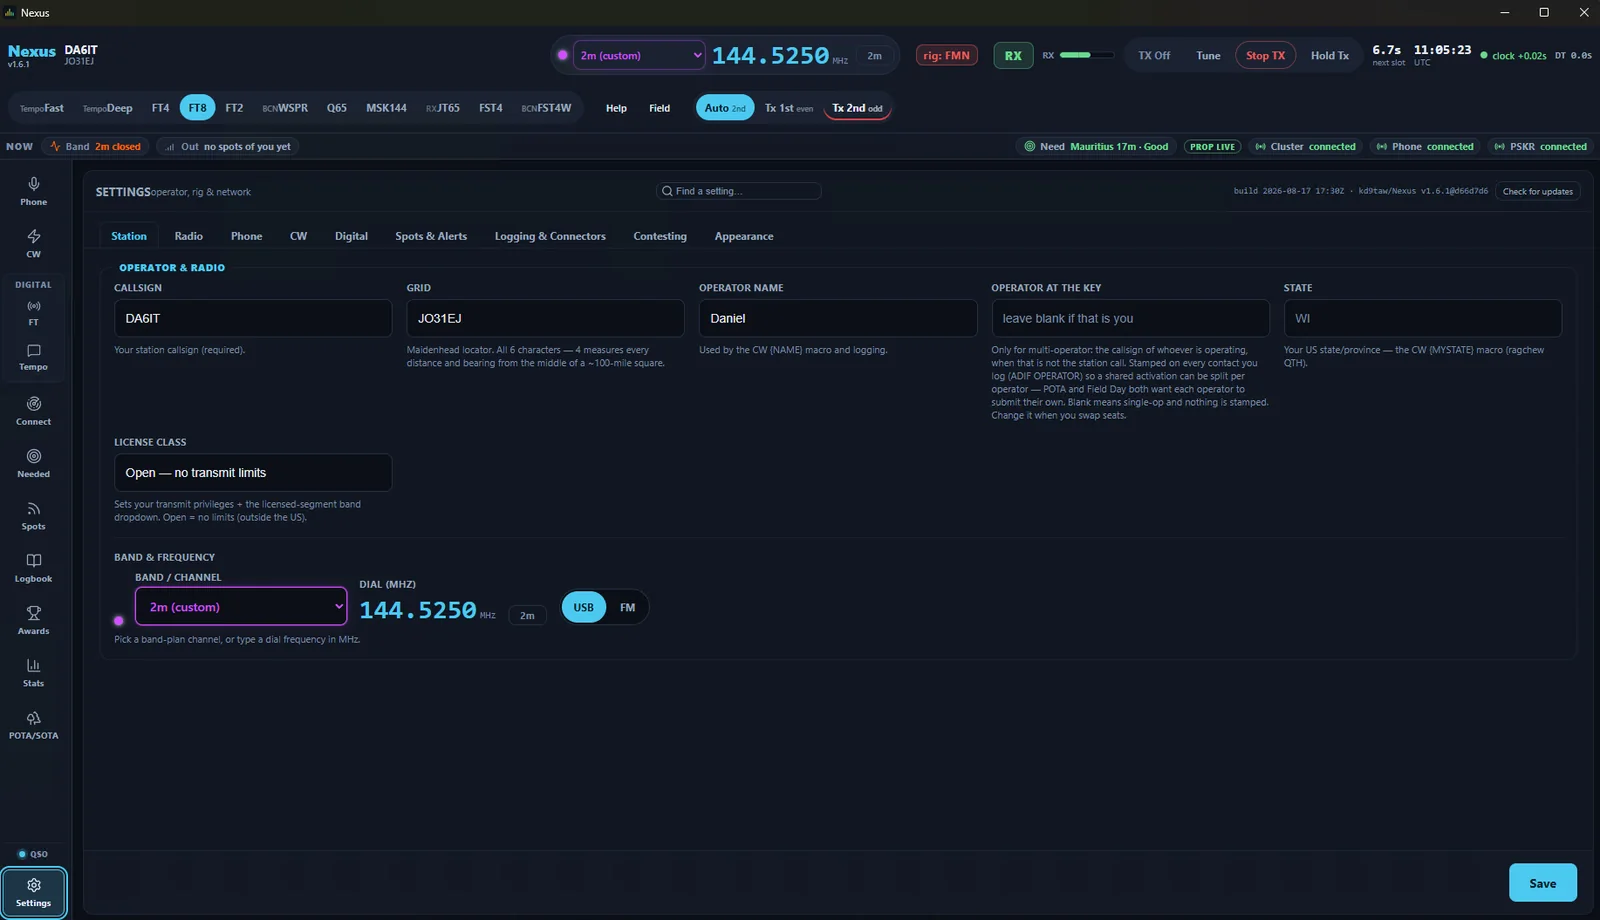
This page already makes it clear that Nexus is not simply a decoder with a few buttons around it. The software treats the station, radio, network and operating workflow as one connected environment.
2. Connect the Yaesu FTX-1 via CAT
My current test radio is the Yaesu FTX-1. I added it as a rig in Nexus and connected it over a serial USB/COM connection. CAT and audio are handled separately. I like that separation because CAT takes care of frequency, radio state and control while the actual CW keying can use its own dedicated method.
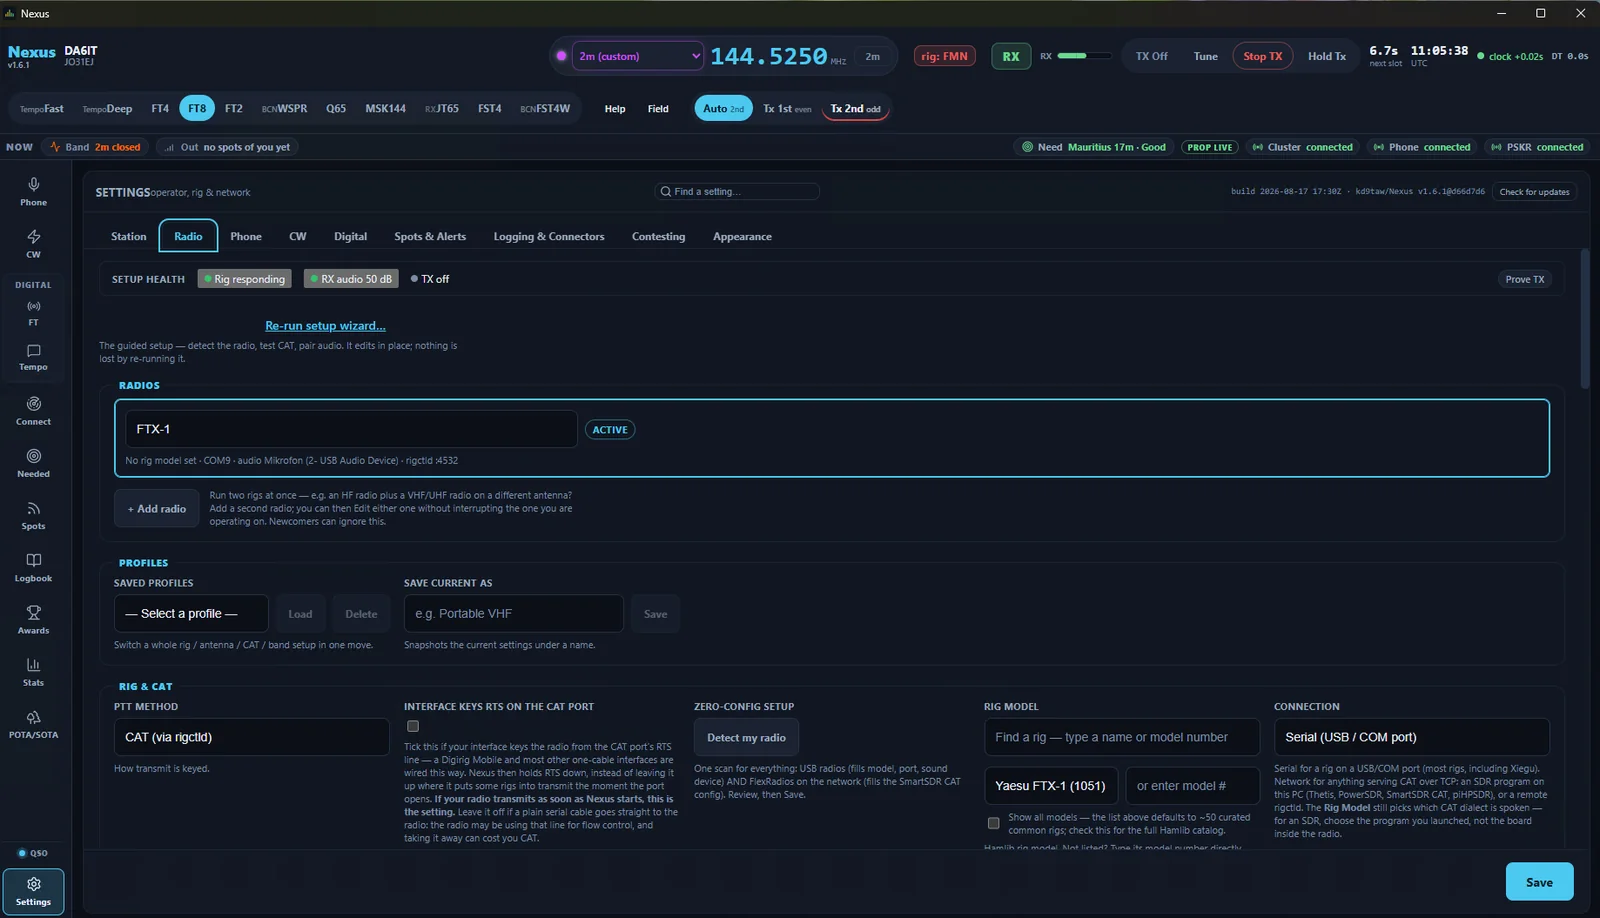
The setup view also shows whether the rig responds and whether RX audio is present. During initial configuration that is useful because I do not need several separate tools just to find out which part of the connection is missing.
3. CW keying: Serial and DTR in my setup
For CW I currently use Serial keyline (DTR/RTS). My setup uses COM10, the keying line is DTR and the sidetone is set to 600 Hz. Nexus therefore controls the actual CW keying of the radio through the dedicated serial line.
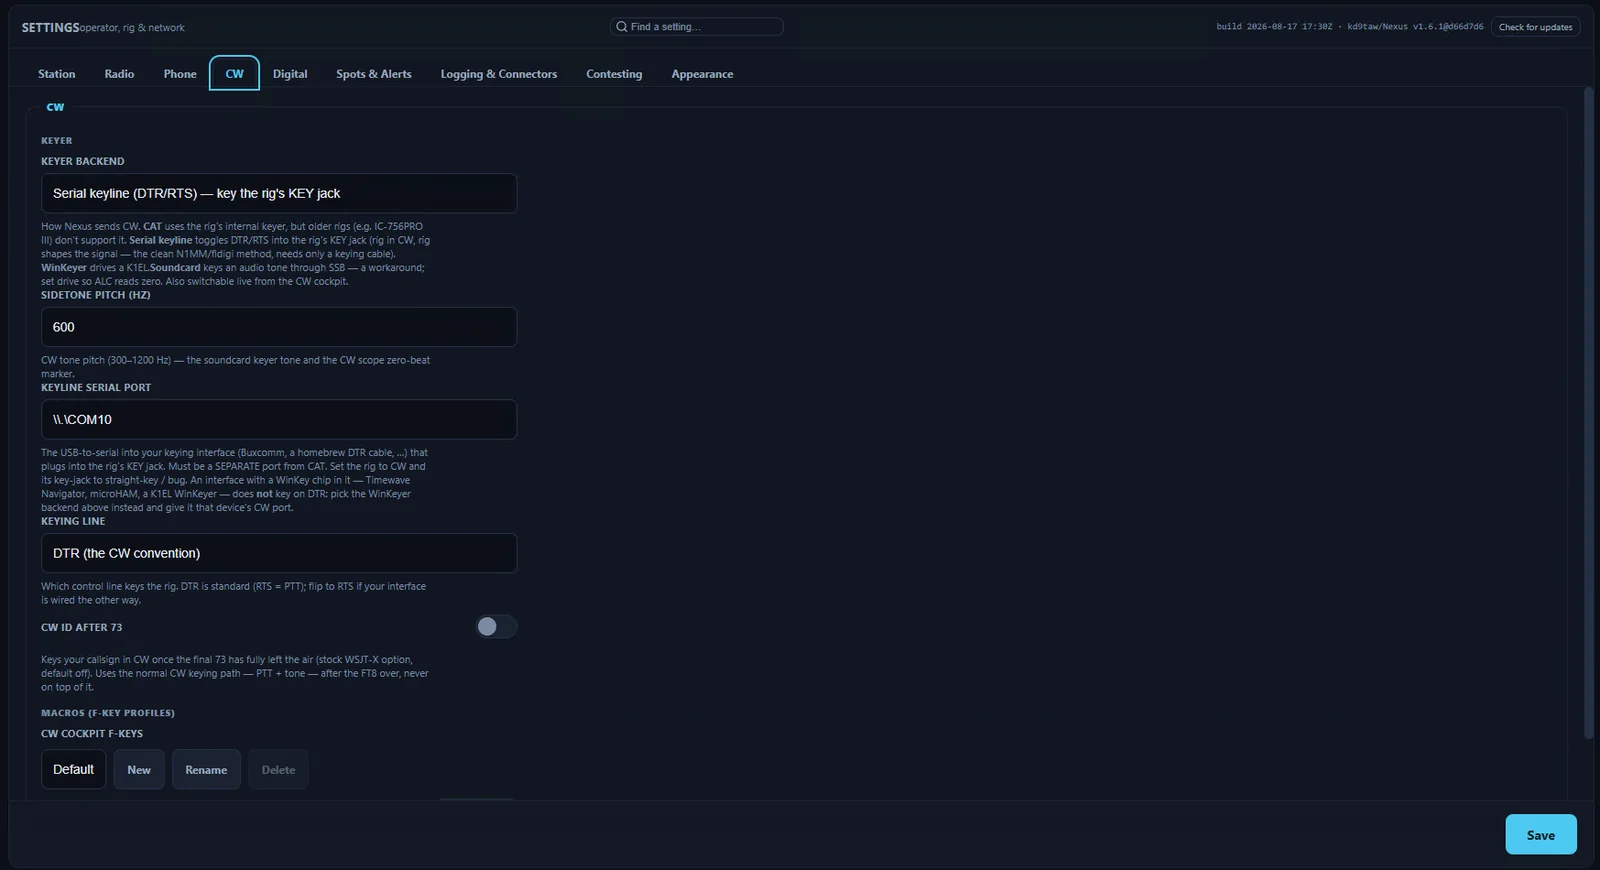
The important detail is that this is separate from the normal CAT link. The serial keying port is a dedicated interface to the KEY line in my setup. Other radios or interfaces may need another method, which is why I appreciate that Nexus supports different keyer backends instead of assuming one fixed hardware arrangement.
4. The CW cockpit: where the QSO happens
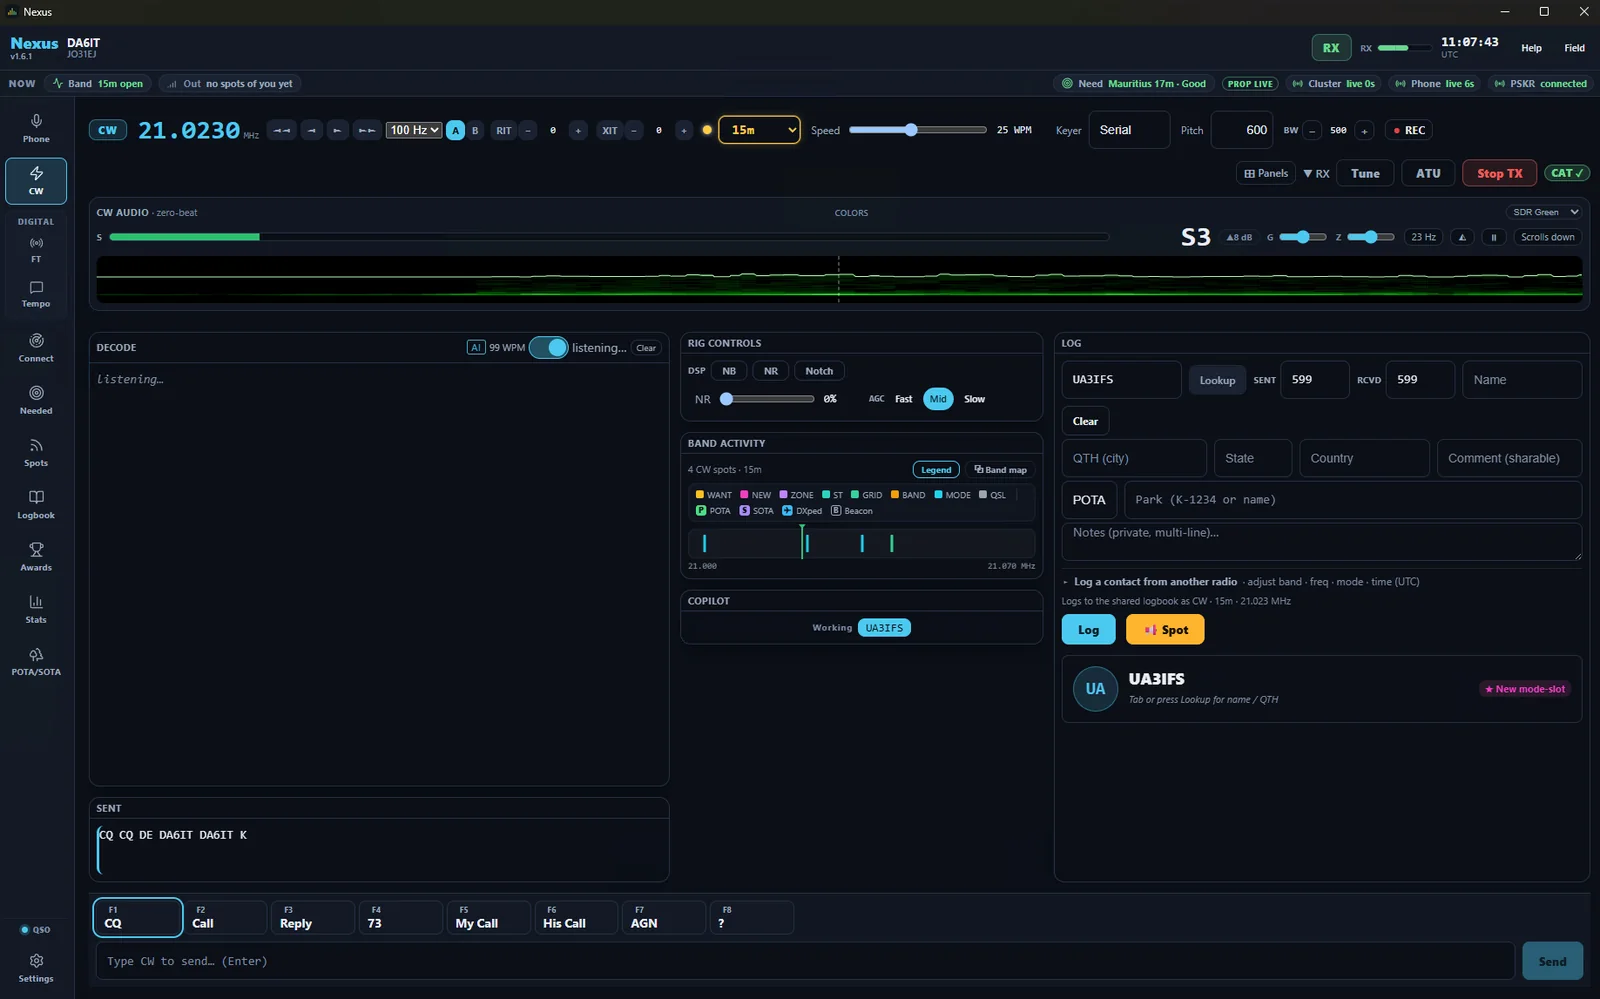
The CW cockpit is the most interesting part for me. Frequency, speed, keyer, audio display, decode area, rig controls, band activity, log fields and QSO function keys all come together in one place. In my screenshot I am on 15 metres at 21.023 MHz with Serial selected as the keyer.
That integration is what makes Nexus practical for me. I do not need to watch a decoder, operate a separate macro tool and then move the callsign and reports into another window. The whole workflow is visible and manageable on one screen.
A simple CW QSO with Nexus
For a normal short QSO, the prepared function keys already cover most of what I need:
- F1 – CQ: send a CQ call
- F2 – Call: call another station
- F3 – Reply: reply including the report
- F4 – 73: finish the QSO
- F5 – My Call: send my own callsign
- F6 – His Call: send the other station’s callsign
- F7 – AGN: ask for a repeat
- F8 – ?: send a question mark
Step 1: Call CQ
With F1 I can send something like CQ CQ DE DA6IT DA6IT K. That is the classic call: CQ, my callsign, and K to hand over to a station that wants to answer.
Step 2: Read the reply
When a station answers, the decoded CW text appears in the decode area. Automatic decoding always depends on signal quality, noise, speed and clean timing, so I treat it as an aid and check the callsign carefully before replying.
Step 3: Reply and report
Once the callsign is correct, F3 sends the reply. A simple example would be UA3IFS DE DA6IT 599 599 K. The classic 599 report is very common in CW and fits naturally into the prepared workflow.
Step 4: 73 and done
At the end of a short contact, the 73 key is enough to close the QSO. The separate callsign keys and AGN are useful if something was not copied cleanly. That already covers a surprisingly large part of a normal CW exchange.
Can I really use CW without knowing Morse?
For a simple QSO, yes — surprisingly well. I do not have to copy every character by ear and I do not need to send the text manually with a paddle or straight key. Nexus can handle a large part of that work while I control the contact through the cockpit and macros.
I still think it is important to understand what is happening. Abbreviations such as DE, K, AGN, 599 and 73 are basic CW operating language, and the general structure of a QSO should not be completely unfamiliar. But that is a much smaller barrier than having to spend months copying fast Morse before making the first contact.
That is the real benefit for me: I can experience CW in practice now. That makes me much more motivated to learn the characters and operating rhythm than practising only in a training app while the first real QSO stays somewhere in the future.
What Nexus does not replace
Nexus obviously does not turn me into an experienced CW operator automatically. Weak, overlapping or poorly sent signals can confuse any decoder. Anyone who wants to operate CW independently should still learn to copy by ear, practise operating technique and gradually become less dependent on the screen.
I therefore see Nexus as a bridge rather than a replacement for learning. It gets me into real operating much earlier, and that is where I start to understand how quickly an exchange actually moves, which abbreviations are used in practice and what the rhythm on the band really sounds like.
Logging, spots and everything else in Nexus
The CW cockpit already contains log fields for the callsign and sent/received reports. Nexus also has a dedicated Logbook area and settings for Logging & Connectors, while band activity and spots are available directly in the operating interface.
I will look at those parts in more detail later. For this test I deliberately do not want to touch every feature briefly and then pretend that I have already tested it properly. My focus is currently very clear: making reliable CW QSOs with Nexus. Everything else is a very large bonus waiting to be explored.
My conclusion so far
Nexus is one of the most interesting amateur-radio applications I have tried recently. Not because it performs one isolated trick, but because it combines an enormous number of functions in one interface. My personal entry point is still CW.
The combination of CAT control, serial keying, decode area, macros, band activity and logging removes exactly the things that had kept me from simply trying a CW contact. I can call CQ, follow a reply, send a report and close the QSO with 73 even though I am not yet a confident CW listener myself.
Someone who already copies CW perfectly will probably look at Nexus from a very different angle. But if you are curious about CW and, like me, have found the initial barrier rather high, this project is definitely worth a look.