
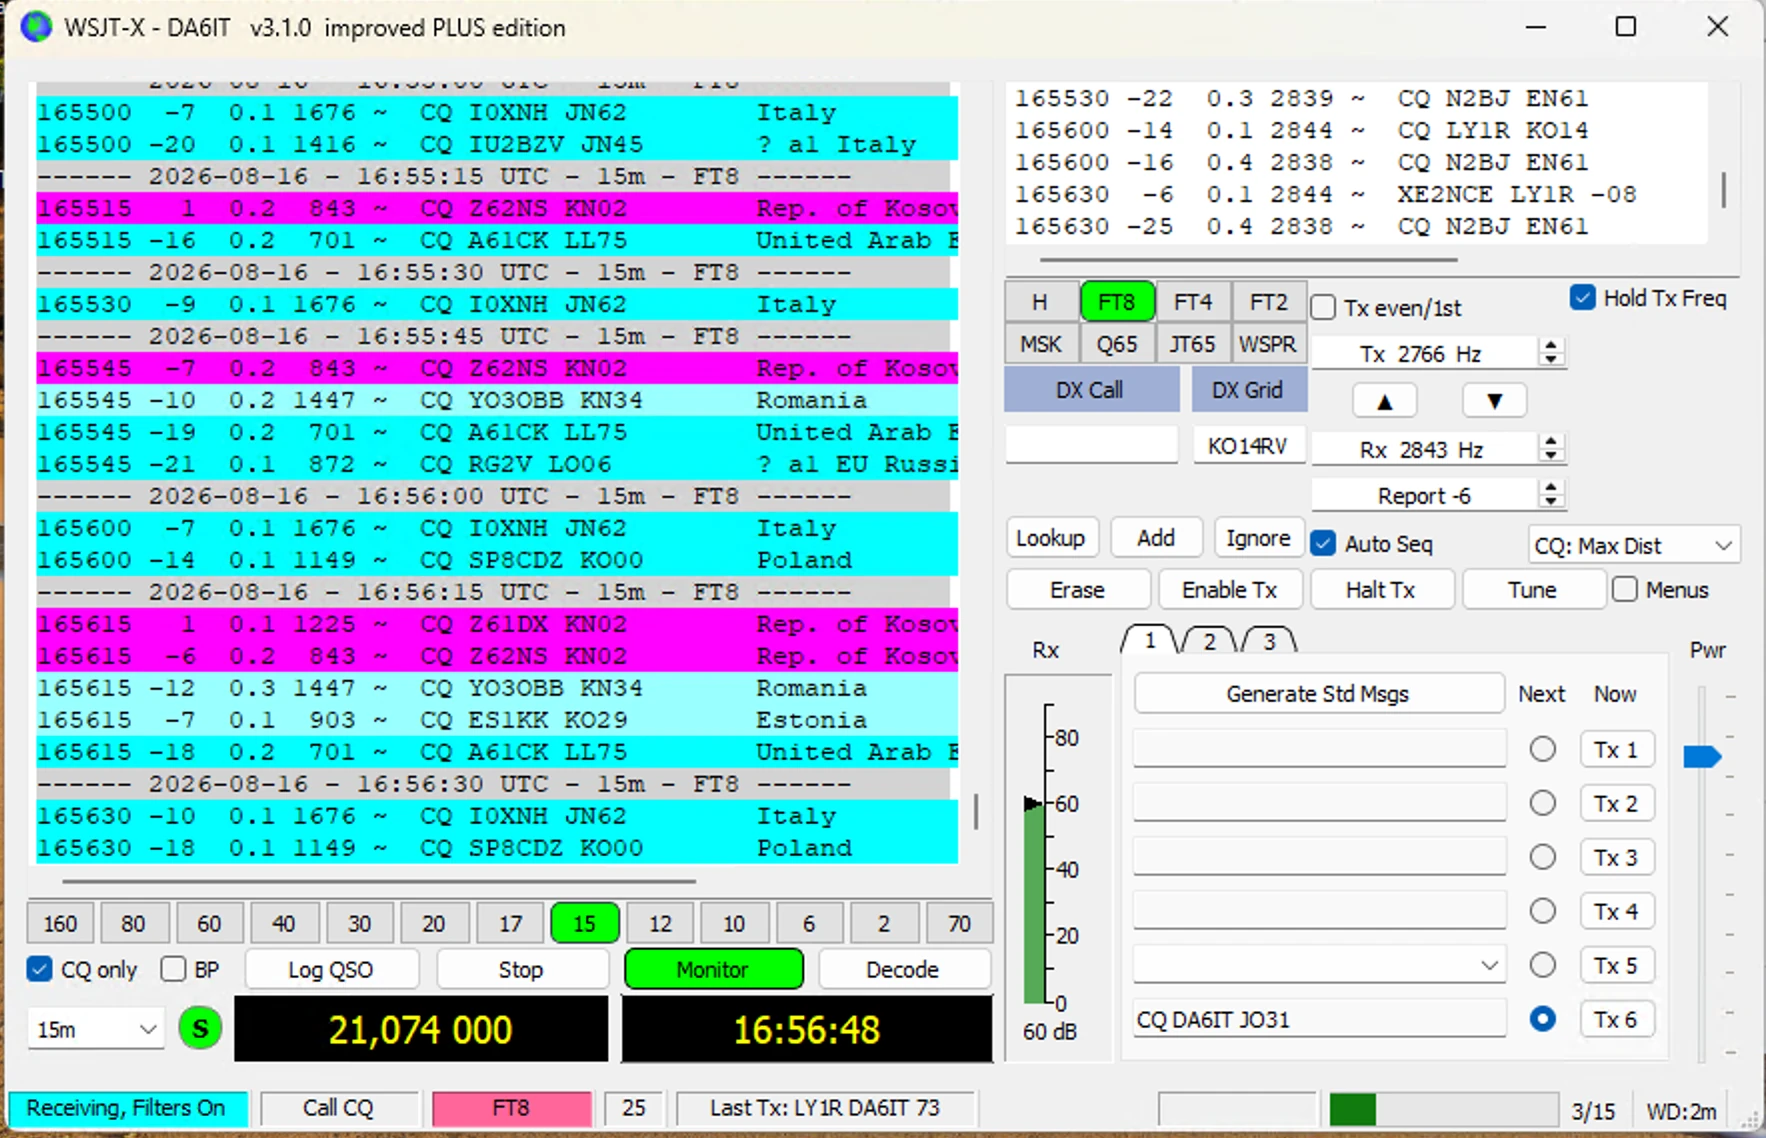
FT8 and FT4 are part of my everyday amateur radio operating now. FT8 in particular is ideal whenever I want reliable QSOs under difficult conditions, with modest power or simply during quieter operating sessions. I also enjoy FT4 – the setup is the same, only the operating pace is noticeably faster.
This article is not abstract theory. It is the setup that has worked well for me with WSJT-X Improved PLUS and the Yaesu FTX-1: USB and COM port setup, audio, ALC, waterfall handling, Hold Tx Freq, Tx even/1st, PSK Reporter and automatic logging into my DA6IT.de Wavelog Offline Logger.
What I need for FT8 and FT4
- a transceiver with data or USB audio support
- a working USB connection between radio and computer
- WSJT-X Improved / PLUS or the official WSJT-X
- an accurately synchronized PC clock – timing matters for FT8 and FT4
- a suitable antenna and the desired band
- optionally the DA6IT.de Wavelog Offline Logger for automatic local logging
If the PC clock is off, FT8 becomes frustrating very quickly. Before digging deeply into audio or CAT, I always check time and synchronization first.
Download links
- Download WSJT-X Improved / PLUS
- Download the official WSJT-X
- NetTime – Windows time synchronization
- DA6IT.de Wavelog Offline Logger – project page
- DA6IT.de Wavelog Offline Logger – direct download
Before anything else: keep the clock accurate
For FT8 and FT4, time synchronization is not a minor detail. The modes use fixed transmit and receive periods, and WSJT-X expects the computer clock to stay accurately synchronized to UTC. The official WSJT-X documentation specifies roughly ±1 second. I prefer to stay much closer than that and simply let synchronization run automatically.
On Windows I use NetTime. It runs as a Windows service in the background. In Settings I set the Update Interval to 1 hour. After that, it is basically something I no longer have to think about during normal operation.
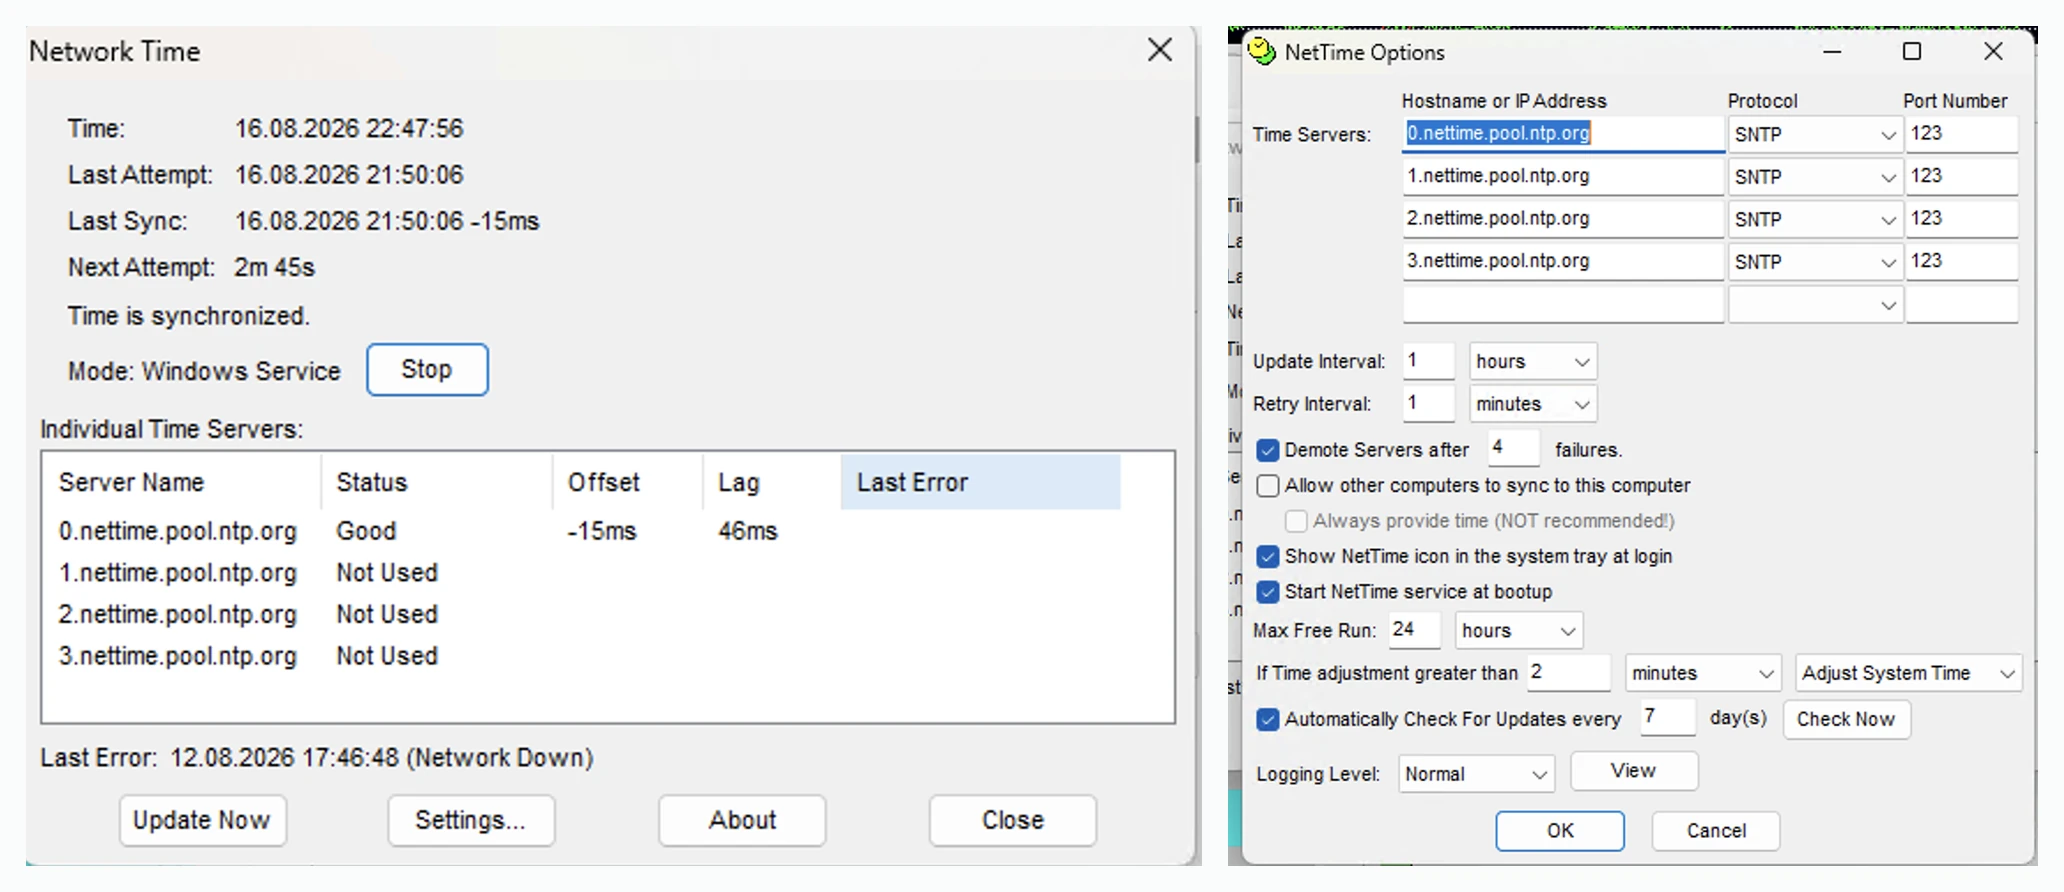
The status window immediately tells me whether time is synchronized. Offset is the difference between my local clock and the time server, while Lag is the round-trip delay of the request. In my screenshot the offset is only about -15 ms, comfortably inside what FT8 and FT4 need.
If decodes suddenly become strange or many stations show unusual DT values, system time is one of the first things I check. CAT, audio and the antenna can all be perfect; a badly wrong clock can still make troubleshooting unnecessarily difficult.
1. Enter the basics in the General tab
In the General tab I first enter my callsign and grid locator. In my case that is DA6IT and JO31EJ. These values should be correct because they matter for QSOs, grid handling, DXCC display and PSK Reporter.
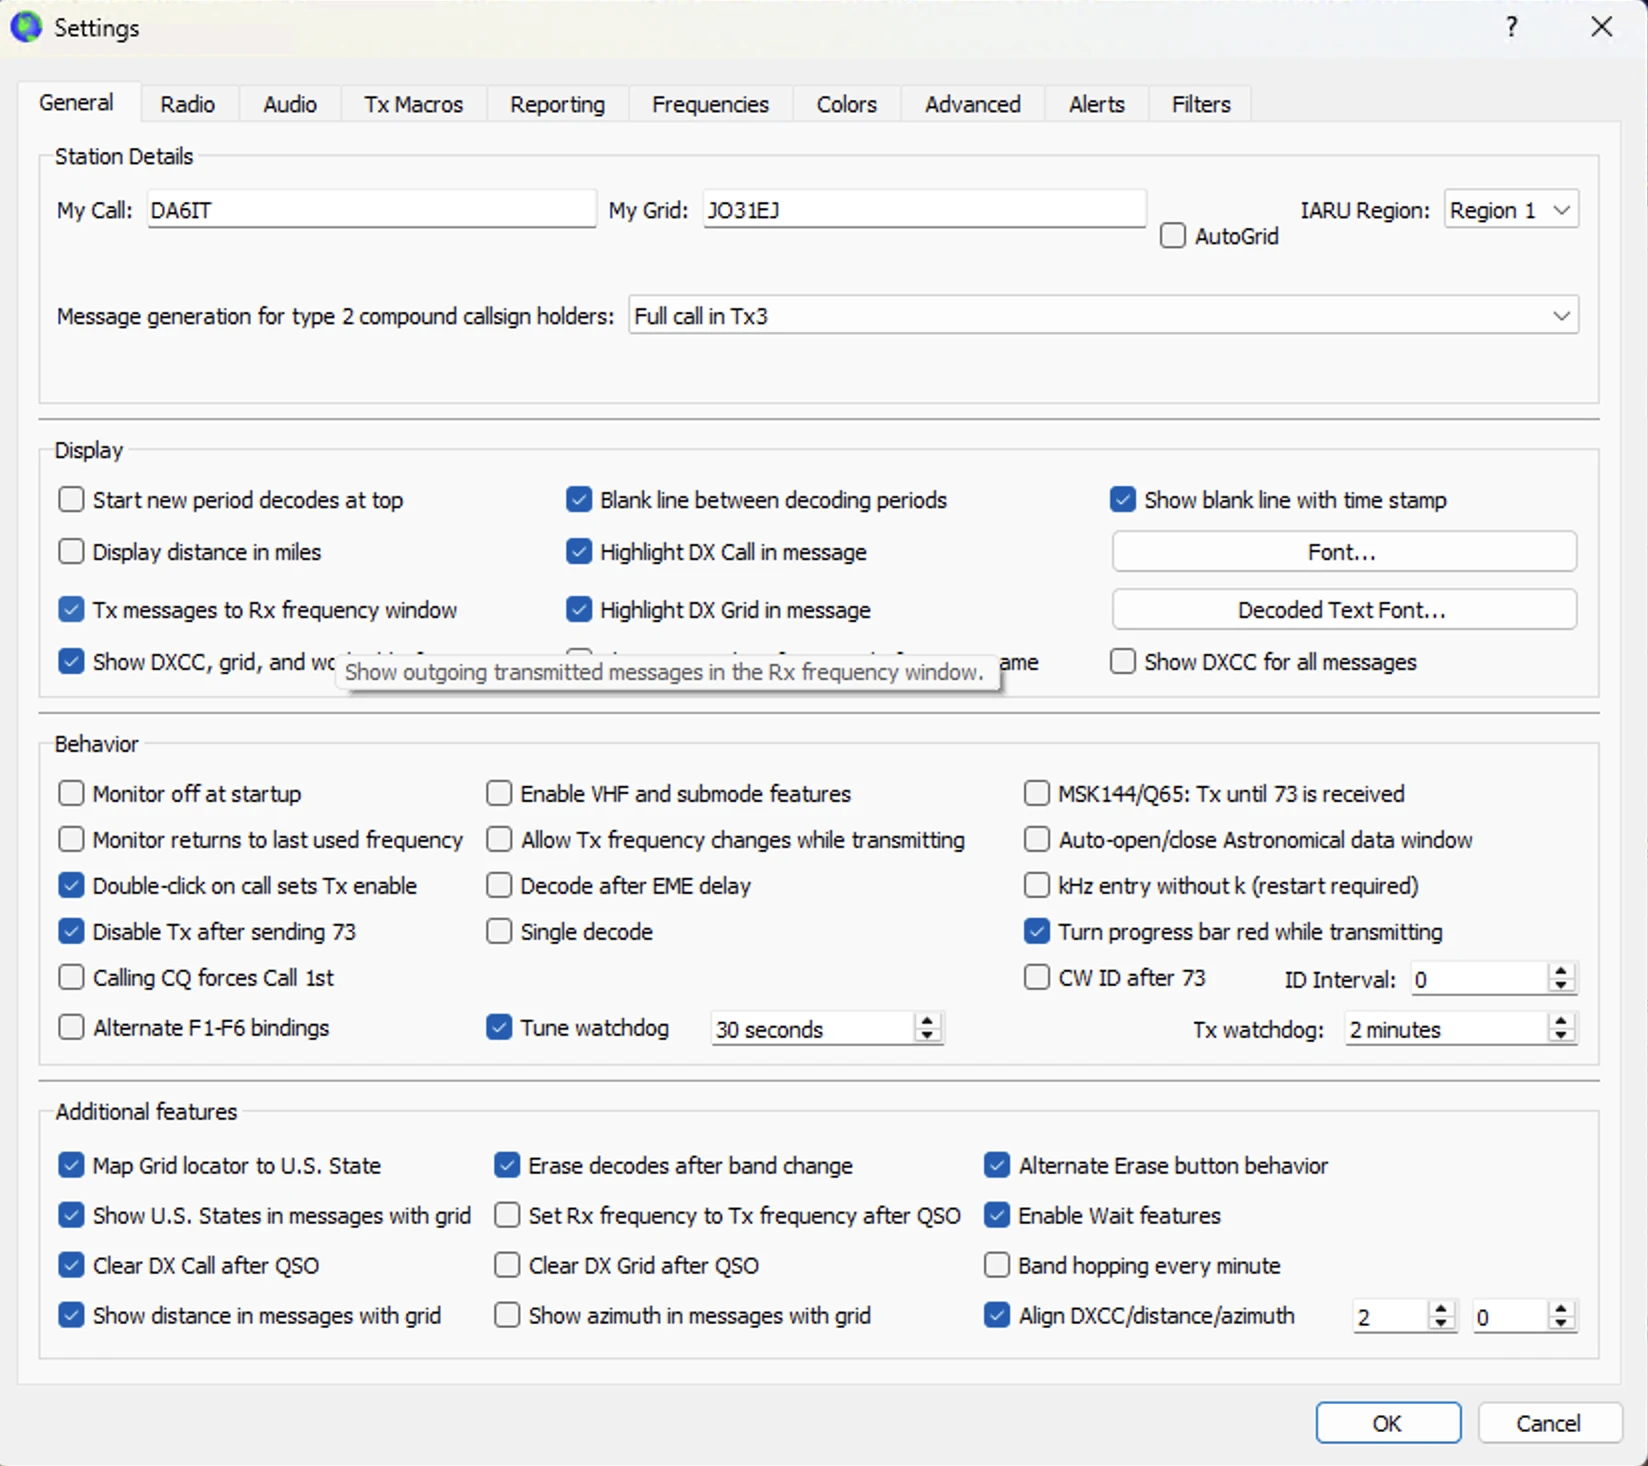
Some options I like to keep enabled are Tx messages to Rx frequency window, Show DXCC, grid, and worked-before status and Disable Tx after sending 73. I especially like the last one because the software stops transmitting automatically after a completed QSO.
The watchdogs are useful as well: Tune watchdog and Tx watchdog help prevent a long unintentional tune or transmission.
2. Set up USB, COM port and radio control correctly
The technical core is the Radio tab. This is where WSJT-X learns how to control the radio, set the frequency and key the transmitter through CAT. In my setup this is the Yaesu FTX-1, the correct COM port and PTT via CAT.
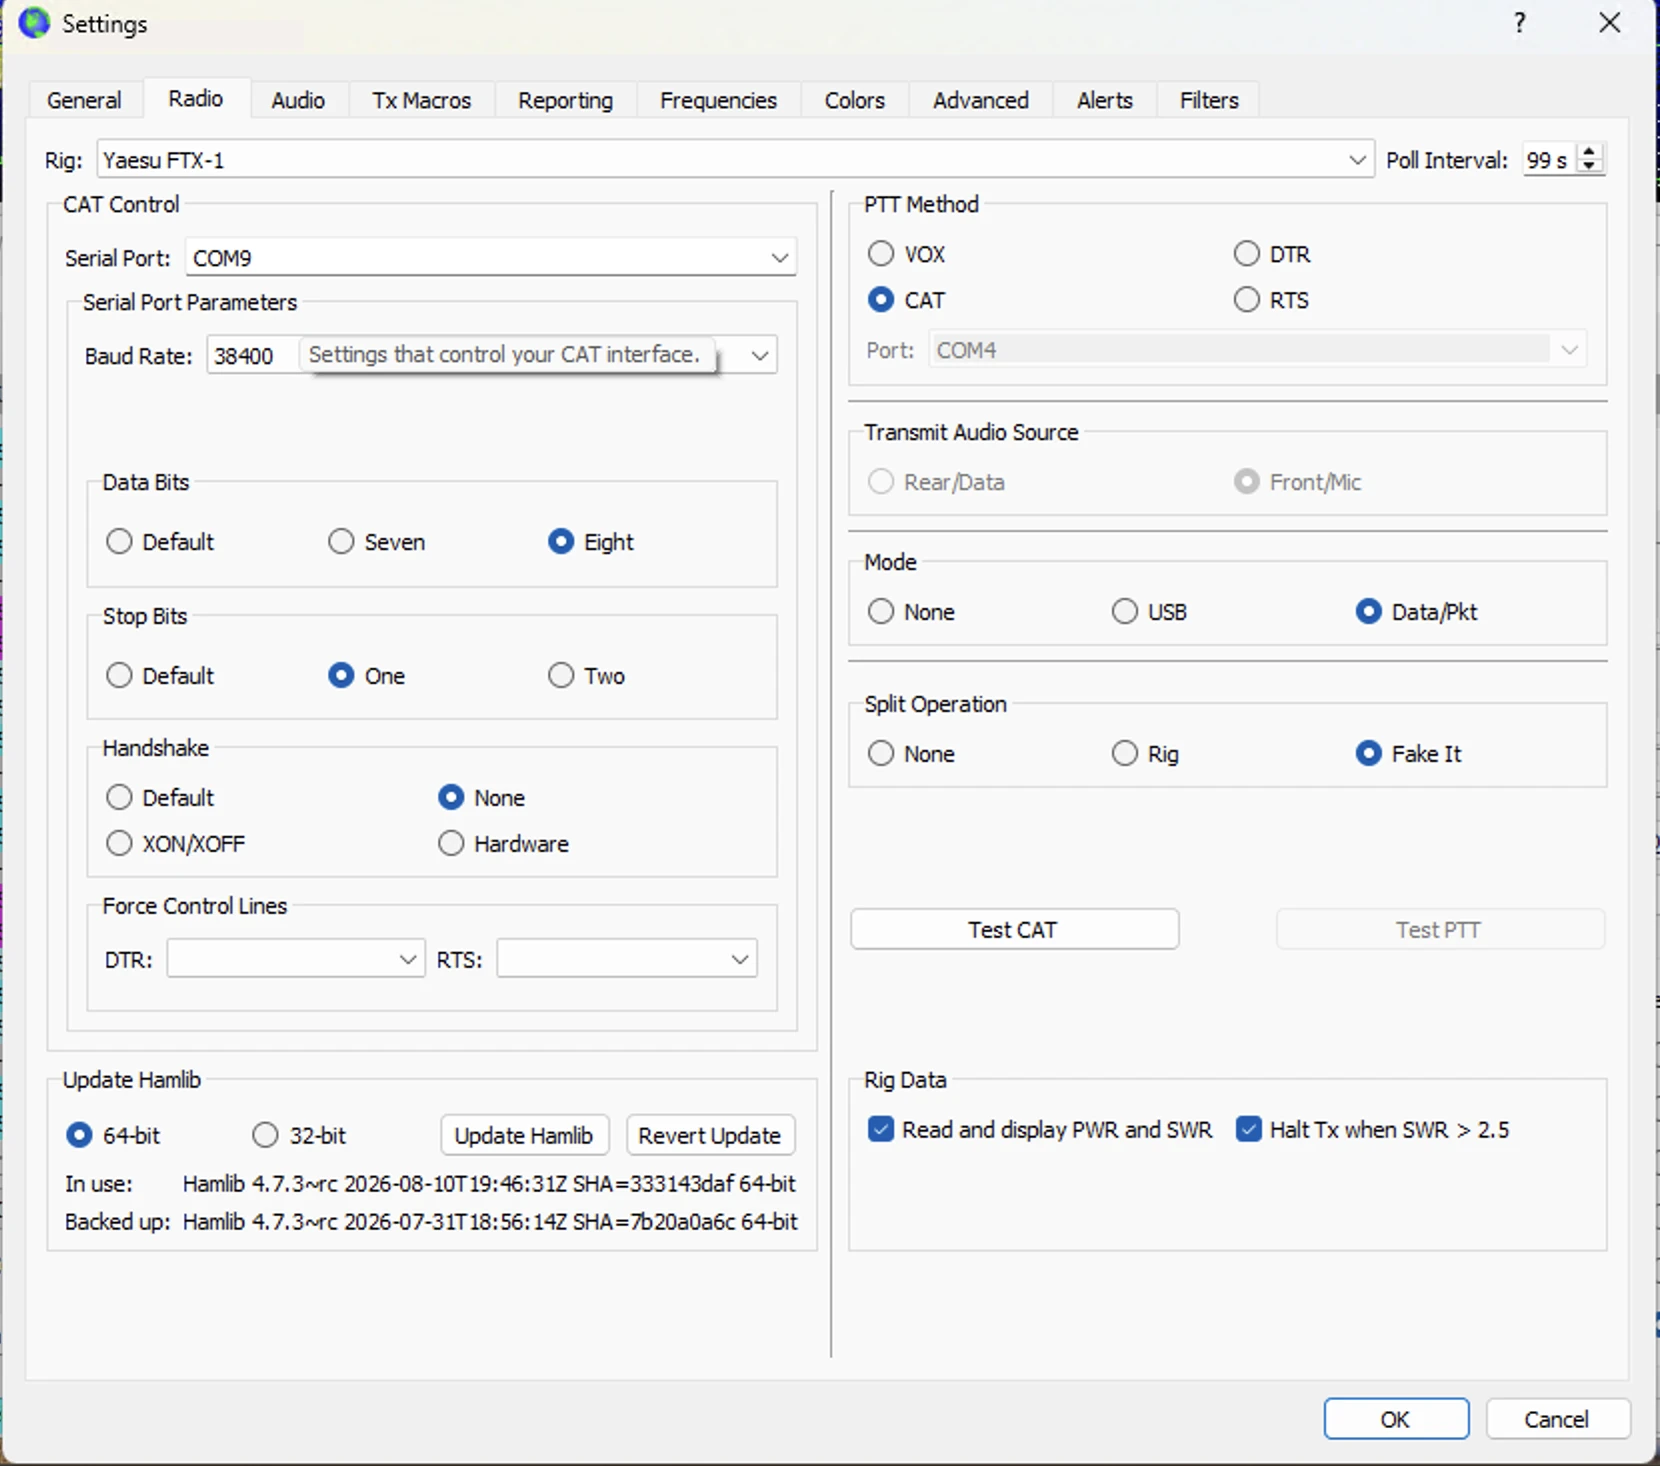
- Rig: choose the correct transceiver
- Serial Port: select the correct CAT COM port
- Baud rate / data bits / stop bits / handshake: these must match the radio
- PTT Method: CAT in my case
- Mode: Data/Pkt
- Split Operation: Fake It
I like Fake It because it avoids pushing me into extreme audio frequencies at the edge of the passband and usually gives cleaner practical operation.
After entering the settings I always press Test CAT. If that is not working, I stop right there and fix it before moving on.
3. Choose the correct USB audio device
In the Audio tab I use the radio USB audio device for both input and output. This is where many beginners accidentally choose the PC microphone or the normal speakers instead.
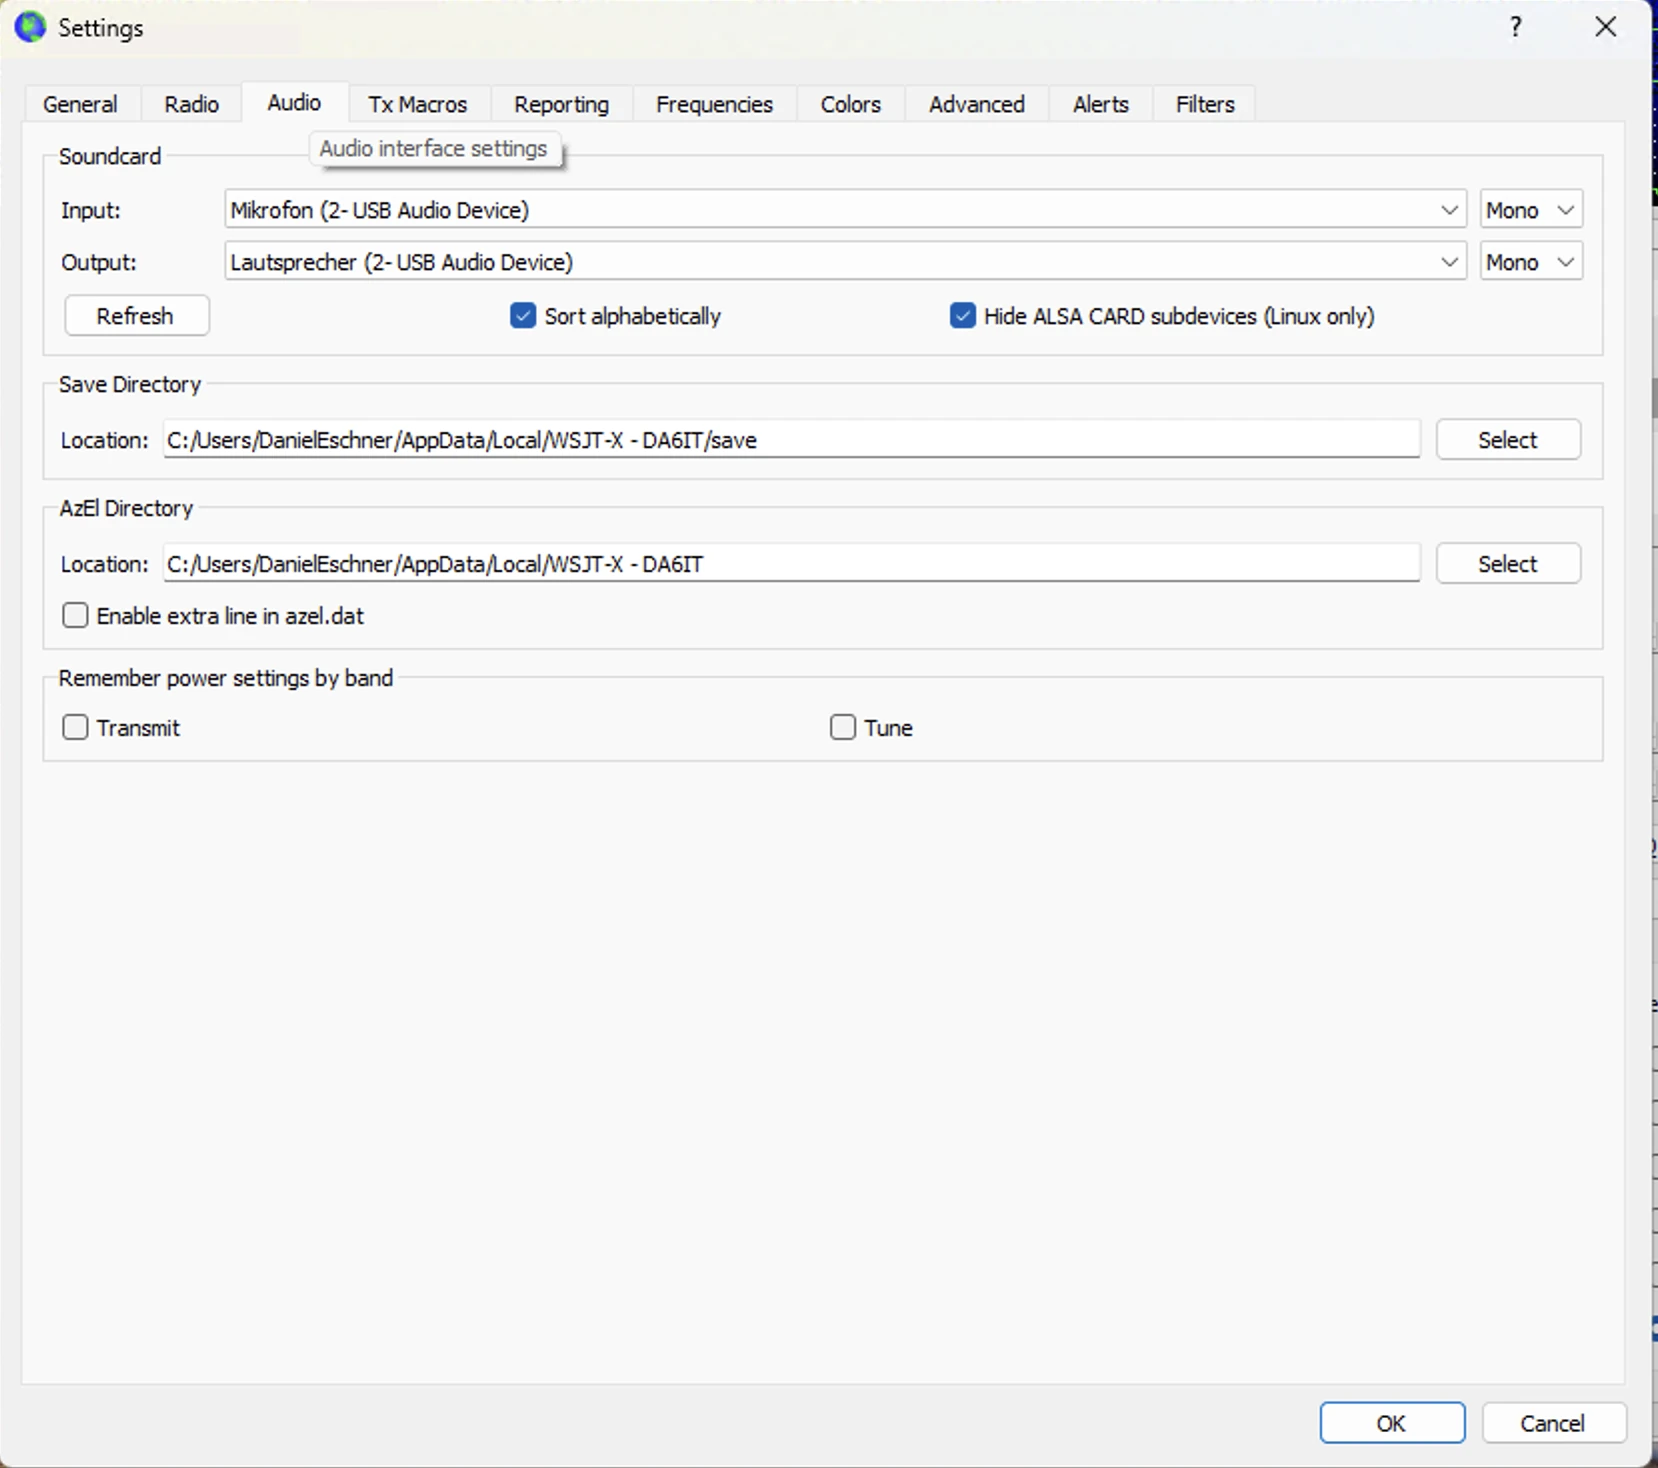
For digital modes I do not want to transmit through the built-in PC microphone. I want a clean data-audio path through the transceiver. If input and output are wrong here, even perfect CAT settings will not save the rest of the setup.
4. Enable PSK Reporter and automatic logging
In the Reporting tab I enable PSK Reporter Spotting. That makes it very easy to check later on PSK Reporter where my signal has been heard. It is excellent for judging propagation, antenna performance and range.
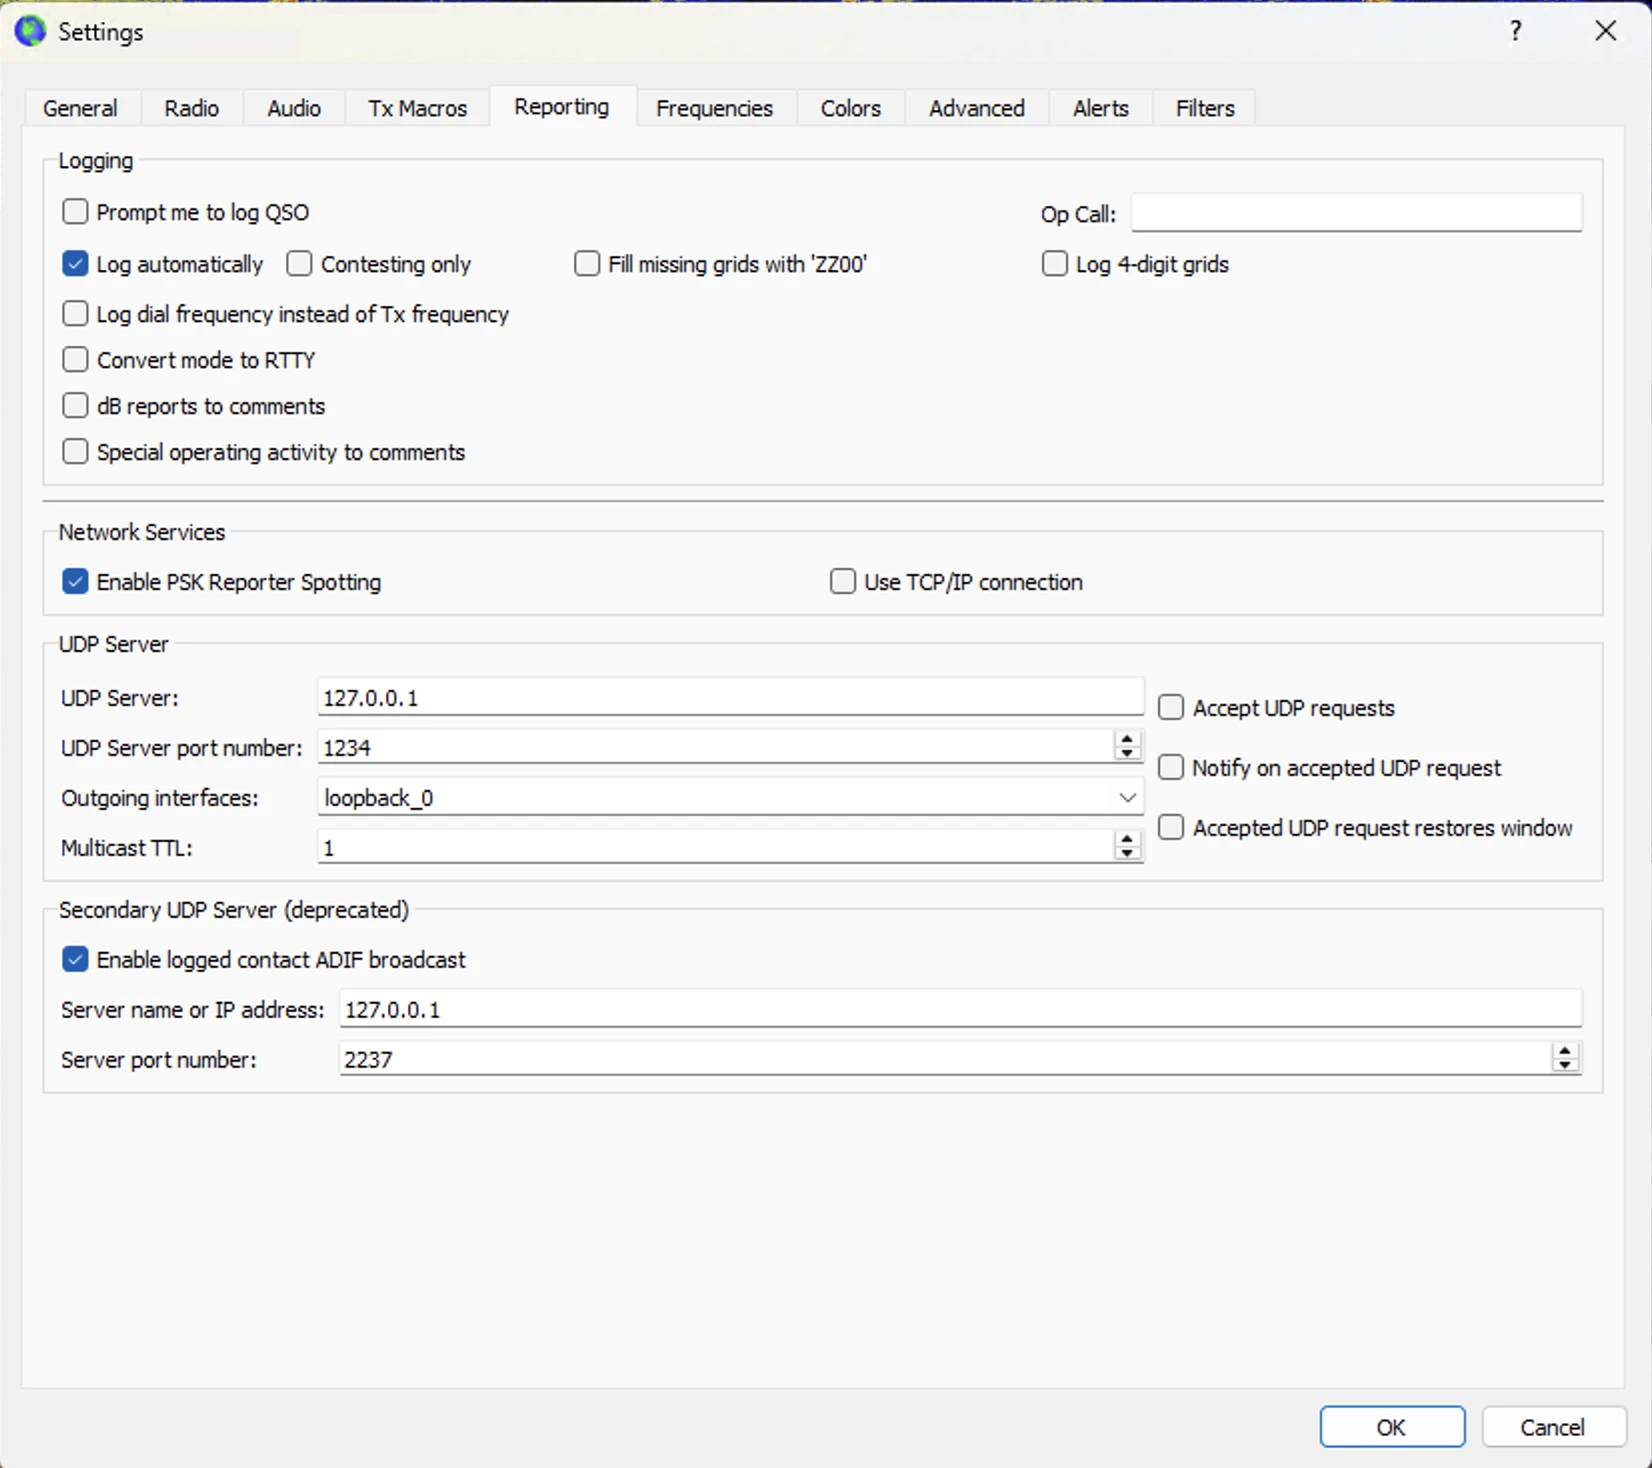
I also enable logged contact ADIF broadcast and send the logged QSOs to 127.0.0.1:2237. That is where my DA6IT.de Wavelog Offline Logger listens. Once a QSO is completed, it appears locally in the logger and can later be synchronized to Wavelog.
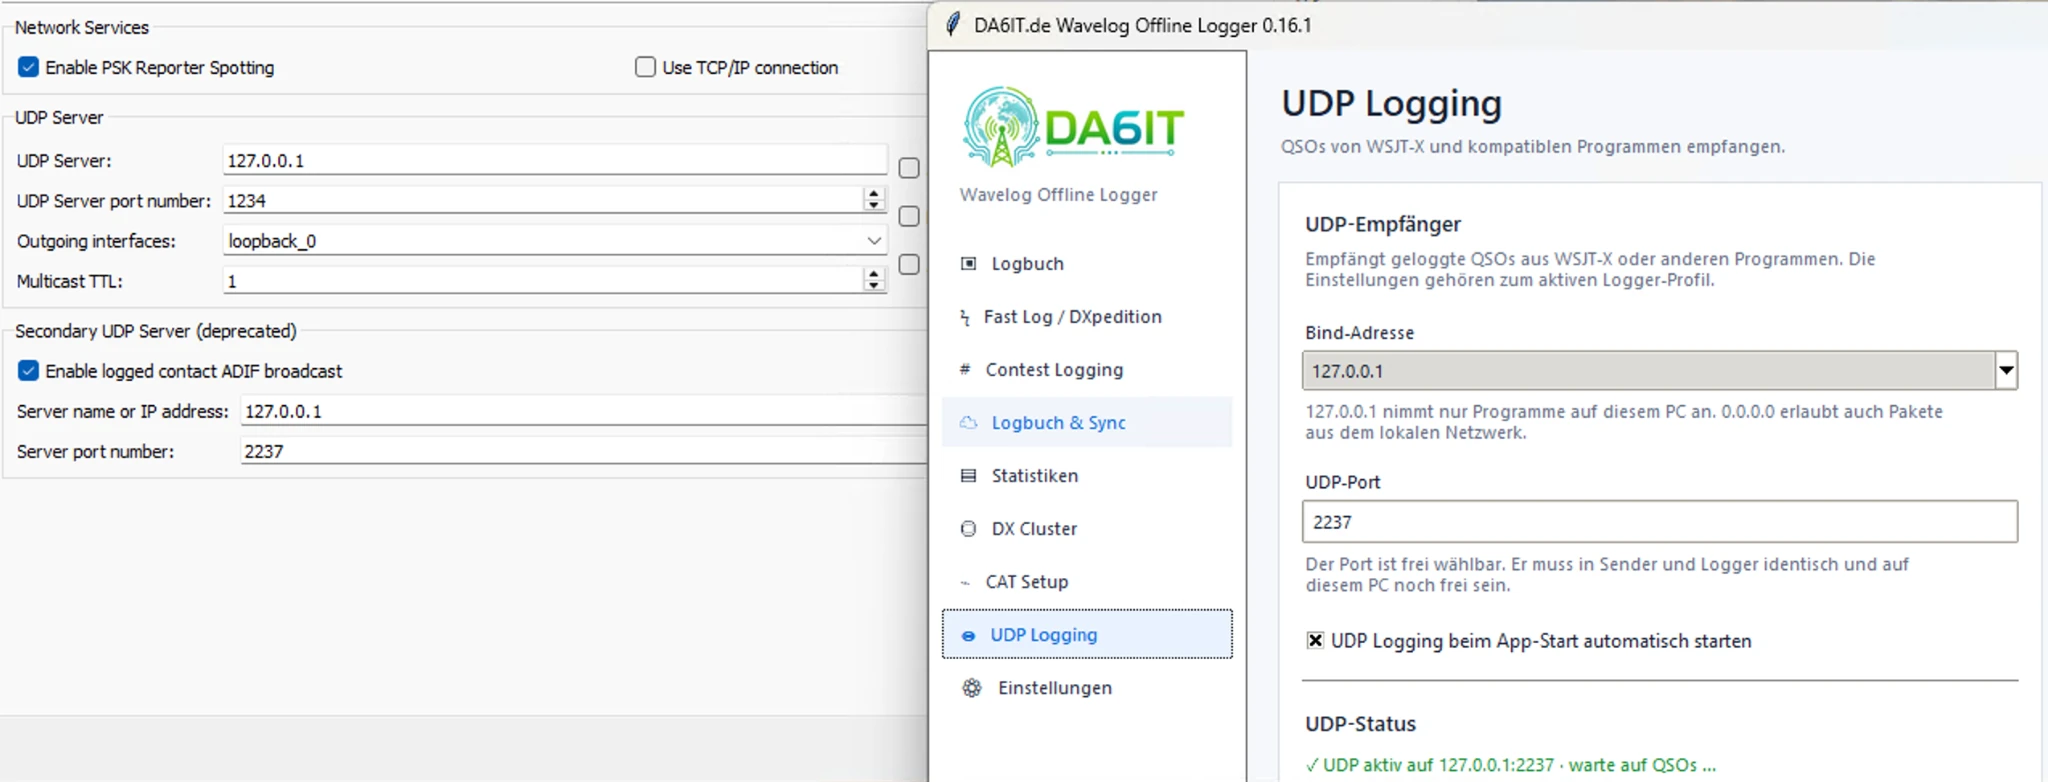
The important point is simple: the port must be identical on both sides. In my setup WSJT-X sends to 127.0.0.1:2237 and the Offline Logger listens on exactly that address and port. I also let the UDP receiver start automatically with the app. Once a QSO is completed and logged in WSJT-X, it is transferred into my local log automatically.
For portable operating, field days or unstable Internet connections this is very convenient: I keep a clean local log first and still have a later path into Wavelog.
5. Choose the correct band
Before operating I choose the intended band. In the main WSJT-X window that is quick through the band buttons. The software then sets the common FT8 or FT4 frequency and I quickly confirm that the radio follows correctly.
This sounds simple, but it matters. If band and frequency are not selected consciously, later troubleshooting often starts in the wrong place. And of course: only transmit on bands that fit your licence, radio and antenna.
6. Find a free spot in the waterfall
The waterfall immediately shows where there is activity. Bright, strong traces mean that something is already happening there. Darker parts are usually the better candidates for my own transmit audio frequency.
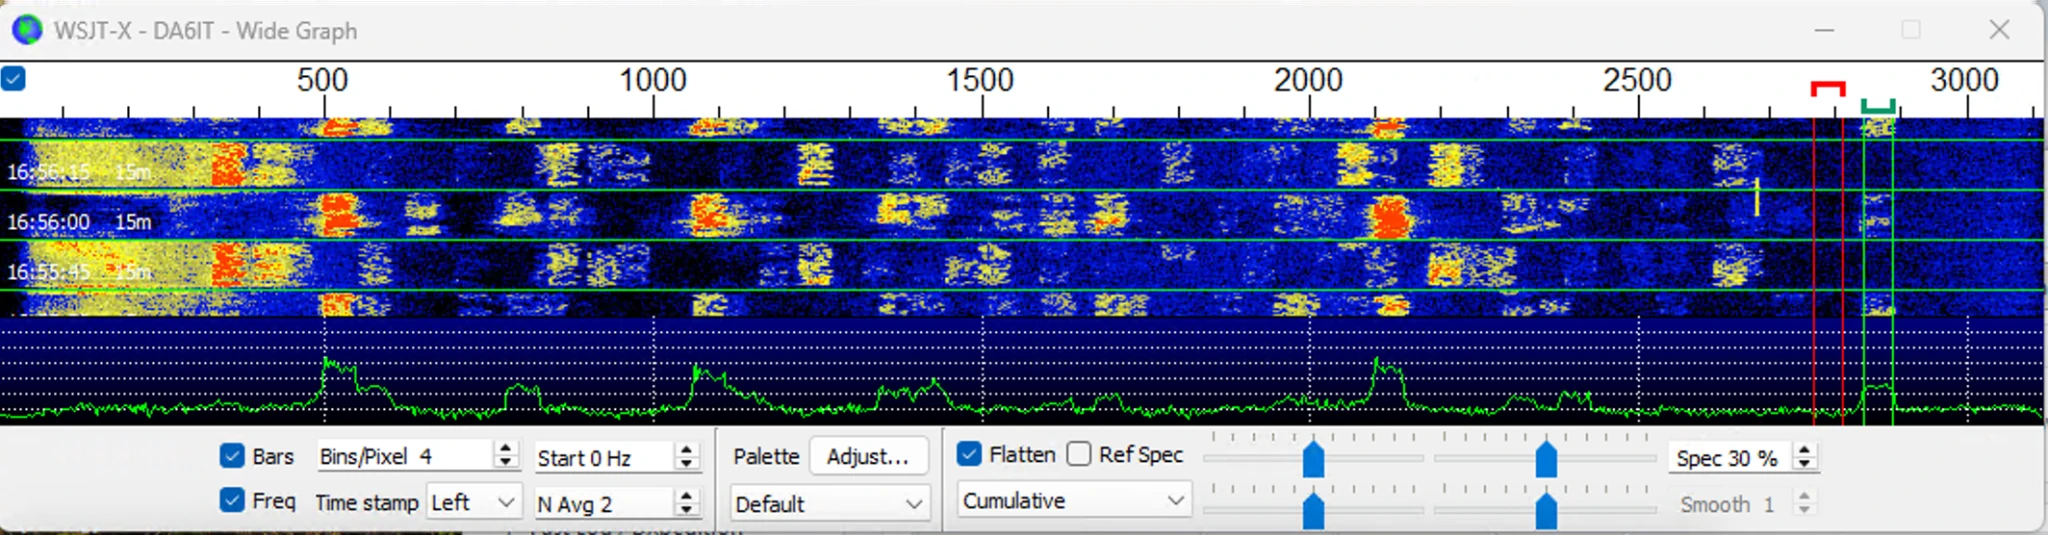
I do not click blindly into the busiest part of the band. I deliberately search for a reasonably free position. That helps me avoid blocking others and also keeps me from transmitting right on top of another signal.
7. Hold Tx Freq – almost mandatory for me
Hold Tx Freq is one of the little checkboxes I really do not want to miss. When it is active, my transmit frequency stays where I intentionally placed it. I can click on other received signals without my own transmit frequency jumping around all over the waterfall.
That is especially useful on busy bands. It keeps me from blocking somebody else accidentally and also keeps me from being moved to an already occupied spot.
8. What does Tx even/1st mean?
FT8 uses fixed time slots. One station transmits in one 15-second period and the other station in the alternating period. Tx even/1st therefore determines in which slot I transmit.
- enabled: I transmit in the first / even period
- disabled: I transmit in the second / odd period
When I double-click a CQing station, WSJT-X usually chooses a sensible opposite slot automatically. Still, it is worth understanding this switch, especially when calling CQ myself or operating more manually.
9. Watch the ALC on the radio
A very important point is the ALC. While transmitting I watch the ALC meter on the radio and, if necessary, correct the level with the right-hand Pwr slider in WSJT-X. Ideally the ALC should show little to almost nothing.
My practical method is simple: press Tune, start with the Pwr slider on the lower side and raise it slowly. While doing that I watch RF power and ALC on the transceiver. As soon as ALC rises noticeably, I back off a little. Digital modes do not need brute-force overdriving – a clean signal matters much more.
10. A few other settings I like
- Auto Seq: makes the normal FT8 message flow much more comfortable.
- Colours in the main window: I keep the colour highlighting enabled because I can spot CQ calls, interesting DXCCs and important messages more quickly.
- Disable Tx after sending 73: avoids unnecessary continued transmission after the QSO.
- Watchdogs: protect me against an accidentally long Tune or TX.
- Show DXCC / Grid / worked before: saves a lot of visual effort and highlights useful information immediately.
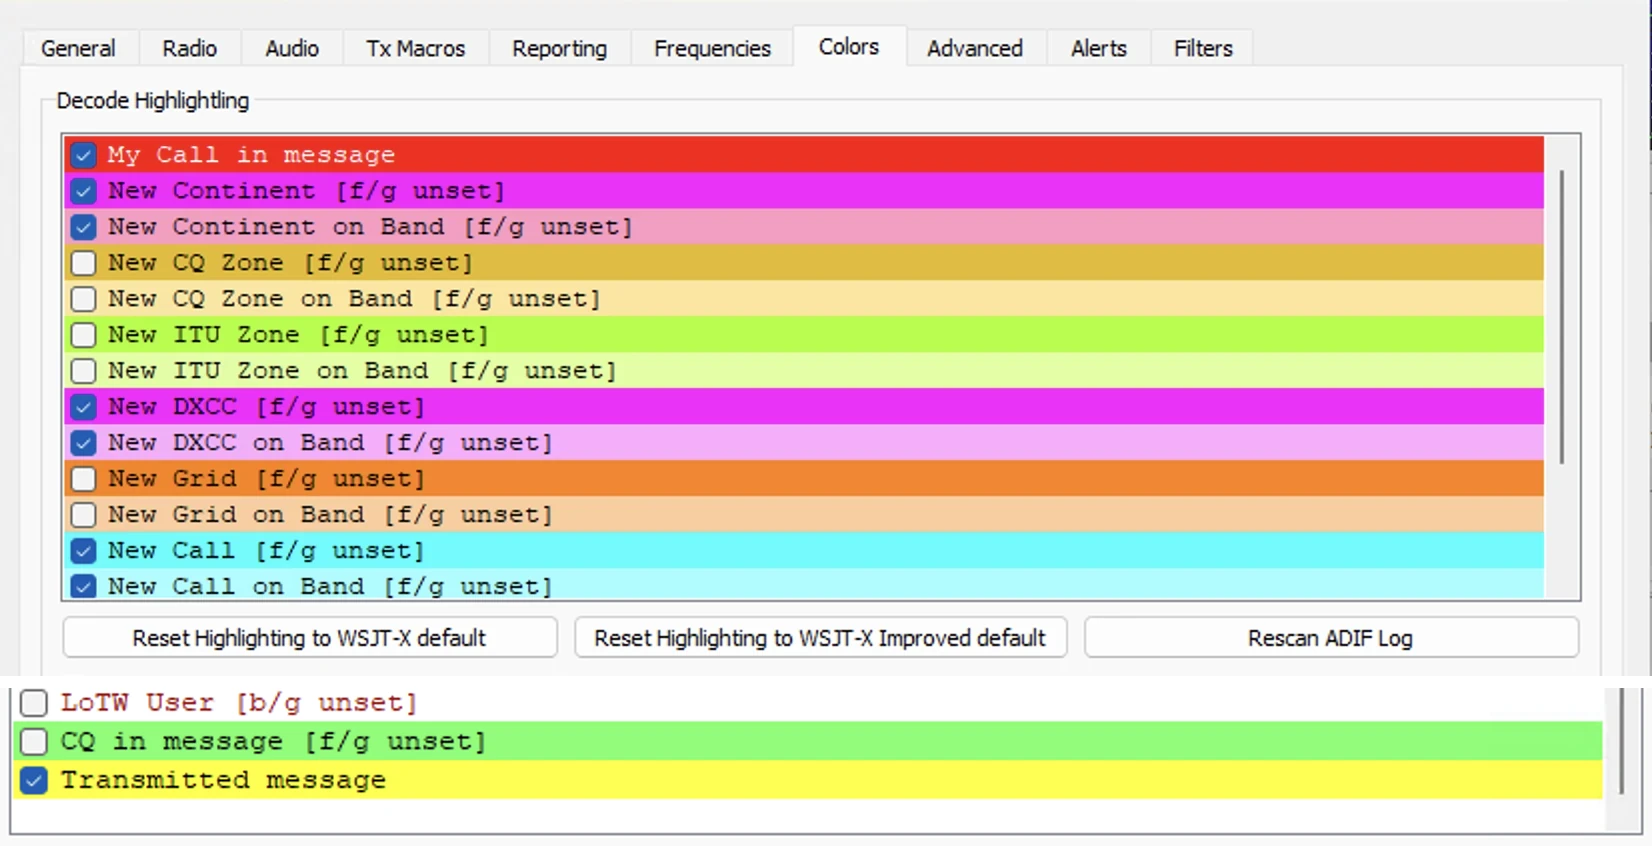
There is explicitly no right or wrong colour scheme here – this is personal preference. What matters to me is that I can recognise important information almost without thinking. My own callsign can be very obvious, new DXCC entities or continents can stand out as well, while CQ messages and my own transmitted messages may use completely different colours. The screenshots therefore show my personal arrangement, not a rule that anyone has to copy.
11. What a typical FT8 QSO looks like for me
- Choose the band and quickly confirm that radio and WSJT-X are linked correctly.
- Start Monitor and let a few periods decode.
- Find a free place in the waterfall and keep Hold Tx Freq enabled.
- Click on a suitable CQ station or call CQ myself.
- Let Auto Seq handle the normal message exchange.
- Keep an eye on ALC and power.
- Finish the QSO – the contact is then logged automatically into the DA6IT.de Wavelog Offline Logger.
- Optionally check PSK Reporter to see where I have been heard.
Typical mistakes at the beginning
- the wrong USB audio device is selected
- the COM port or CAT parameters are wrong
- the PC clock is off
- ALC is far too high because too much audio drive is used
- TX frequency jumps around because Hold Tx Freq is not used
- transmitting directly into a busy area of the waterfall
- PSK Reporter or UDP logging are not enabled and troubleshooting starts in the wrong place
Conclusion
FT8 and FT4 do not have to be complicated. If CAT, audio and ALC are set correctly, actual operating becomes surprisingly relaxed. That is why this setup has worked so well for me: choose a free transmit frequency consciously, use Hold Tx Freq, keep ALC under control and log QSOs automatically into a local logger.
Once WSJT-X is set up properly, FT8 and FT4 become very pleasant everyday modes – whether from the shack, in portable operation or later together with the Offline Logger as a clean local logging path towards Wavelog.